Understanding the degradation of soft magnetic materials through the manufacturing process of electric motors
17 March 2021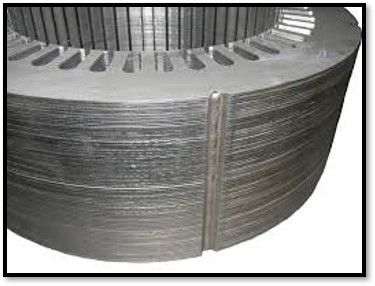
There is an unprecedented level of interest in soft magnetic materials which make up the cores of motors largely driven (excuse the pun) by developments in areas such as more electric transportation. With manufacturers pushing the envelope of machine design it is imperative that our understanding of the performance of the materials under these conditions keeps pace. If we can do this then the benefits are clear. Better representation of material properties in design software will allow more refined solutions and better predictions of in-service performance and lifetime. Importantly, this understanding can also lead to the delivery of materials with properties better tailored to the application requirements.
In this post we are going to focus on explaining the degradation of magnetic properties through the manufacturing process. We will not be covering the related area of in-service degradation which can be significant in applications with extended periods at temperature or when subject to large or cyclic stresses.
Let us look at the main manufacturing steps for a motor as an example of a typical electrical machine which would normally be constructed from a lamination material such as electrical steel (a silicon iron alloy used in the vast majority machines) or cobalt iron (a speciality alloy used in high performance applications such as aerospace and motorsport).
Our soft magnetic lamination material, in coil form, is stamped into shaped parts for the stator and rotor. Obviously, there are other methods of cutting the material by laser, electro-discharge machining (EDM) or water jet and each has their pros and cons but for volume manufacture stamping is currently the predominant route. Next the laminations need to be stacked and joined – again there are a variety of possibilities here and we will look at a few of them. The windings are then inserted into the stack before it is then fitted into a casing – usually by a shrink fitting process.
We are going to look at how some of these processes can affect the magnetic properties, but first let’s look at the basic properties of a typical soft magnetic lamination material.
The figure, below, shows the magnetic B-H characteristic of an M250-35A grade of non-oriented electrical steel – a pretty good motor grade – at a peak magnetic flux density of 1.7 T and a frequency of 50 Hz (Perhaps not the most relevant reference point but useful for illustrating the basic properties)
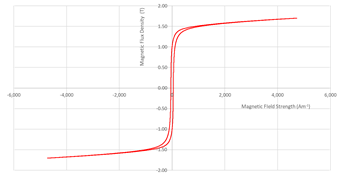
We can see everything we expect of a good soft magnetic material – a nice steep characteristic indicating high permeability and a narrow loop indicating low loss (and therefore high efficiency)
Now let’s see what happens when we subject this lamination to a uniaxial compressive stress in the plane in the figure below.
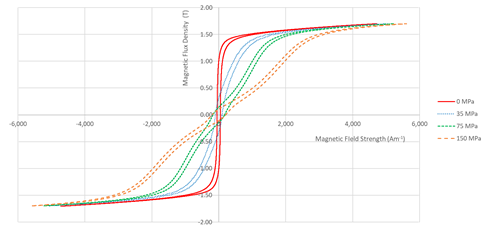
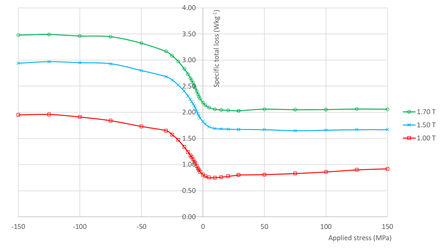
With increasing stress, the loop skews over, i.e. the permeability reduces, and also gets wider, i.e. the loss increases. We can see the effect summarised for the loss of the material over a stress range of +/- 150 MPa (megapascal) in the following figure showing a small improvement under modest tension whilst under compression we see a large increase in the loss (which will be accompanied by a decrease in the permeability) with the effect levelling off at higher stresses – it is worth saying that we are well within the yield stress here. The change of properties is linked to large changes in the magnetic domain structures of the material due to a close coupling between strain and magnetisation and can be improved by alloying, although this is always at the expense of other properties.
Back to manufacturing effects, let’s start with shrink fitting. The effects of this process are relatively difficult to quantify experimentally, and the majority of investigations are computational. Theoretical stress profiles are computed and the effect of these on the hysteresis component of the iron loss can be modelled to give an overall effect on the machine.
I am an experimentalist at heart and, in Cardiff, we have tried to simulate shrink fit stresses using precision machined rings (shown below) to create a range of hoop stresses in test stacks – these rings are heated, dropped over the stacks and allowed to cool prior to testing.
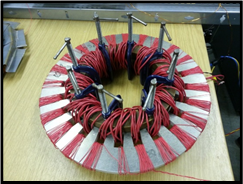
The results from this investigation were not as conclusive as we would have hoped, but in general there was broad agreement with the computational studies showing total losses increasing by up to 20%.
Moving on to joining – there are a range of techniques used for joining stacks together but perhaps the most common are welding and interlocks. Interlocks are small features introduced into the laminations during stamping which lock them together and studies have shown their influence on loss and permeability compound as the number of interlocks per lamination is increased with loss increases of, again, up to 20% . Each interlock adds a region of damage, the effect of which is dependent on the relative size of the inlock and the lamination at that point.
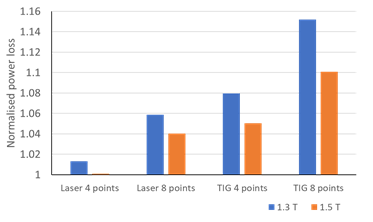
Welding seems on the outside of stator stacks is also seen to have a compounding effect on loss and permeability due predominantly to the heat affected zone around the weld (but also some increase in eddy currents due to short circuits). The graph below shows the increase in power loss due to welding and identifies the improvement that laser welding can give over TIG welding due largely to better control of the temperature rise.
Finally, we will look at stamping. As mentioned above stamping is by far the most popular method of cutting motor lamination, but all cutting methods (we mentioned laser, EDM and water jet for motors but guillotines and slitting may be used in other applications) will lead to some degradation of properties. Stamping creates a damaged edge zone resulting in a large residual compressive stress in the vicinity of the edge and then a longer-range degradation region. The magnitude of the effect is dependent on several factors including tool wear, die clearance, lamination thickness and a range of metallurgical parameters.
Work in Cardiff has focussed on characterising this effect using an automated needle probe technique which enables us to make measurements of very localised changes to the magnetic properties over areas of a few mm2. The figure below shows the test jig and a close-up view of the measurement probe with the needle probes either side of Hall magnetic field sensor.
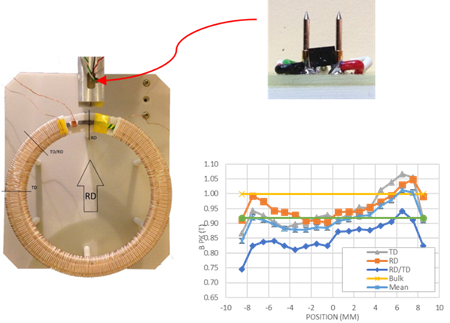
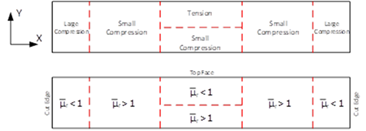
Typical results, bottom right, are initially a little difficult to understand but can be explained by a model of stress distribution shown in the top figure below which can be described by a permeability function which is dependent on position relative to a cut edge.
This permeability function has been applied in a commercial finite element modelling (FEM) package and the simulations have agreed well with measured results in simple geometries. Future work will focus on more rapid determination of the model parameters and more efficient implementation in design software.
To close I would like to summarise where we stand in out attempts to properly account for degradation in the manufacturing process. Characterisation techniques in magnetics labs are now well advanced whilst our fundamental understanding of the physical processes is developing rapidly in some of the key materials. A process-based sensitivity analysis could be used to focus developments in the manufacturing route and combining this with a fully validated modelling and design tool is the ultimate goal.

