Conserving Viking Archaeology Part 1: The Batch Treatment of Iron Finds from the Site of the Great Army Encampment at St Wystan’s Church, Repton
4 January 2023In 865, The Great Army, a 3000-strong pan-Viking force, arrived on the Kent coast.
According to the Anglo-Saxon Chronicle, the force reached Repton, Derbyshire in 874, and established a long-term camp. Once the Mercian king fled the country, the Vikings took control of Mercia, and later incorporated East Mercia into the Danelaw. Until recently, contemporary writing was the only evidence such a camp had existed.
Digs around St Wystan’s Church in the 1970s uncovered remains of Viking burials and a defensive ditch resembling those found in Scandinavia.
Further excavations were carried out in 1998, 2016, and 2018 to gauge the nature of Viking influence on the surrounding area. These uncovered many objects dateable to the late ninth and early tenth centuries.
Six other conservation students and I were lucky enough to treat metal finds from these digs while on placement at Cardiff University. This blog series goes behind the scenes at the lab, looking at how conservators contribute to discoveries we make about the past from the evidence hidden beneath our feet.

Image: Emma, Sorcha, Tessa and Courtney (left to right) inspecting and sorting the iron finds.
The Finds
Most of the objects were iron, many encased in thick layers of corrosion making them impossible to identify with visual inspection alone. These had been X-rayed by a previous student cohort hoping to pin down their appearance and likely function from the shape of the uncorroded iron core. However, further progress was hampered by restrictions during the COVID-19 pandemic.


Image: Photographs of the X-rays of the iron finds taken by the class of 2019-20.
Treatment Stage 1: Batch Consolidation
As we checked through the boxes, we found a few finds in worse condition than they had been two years earlier.

Image: Students viewing the X-rays using lightboxes. Background: Courtney. From left to right foreground: Emma and Tessa.
The X-ray shows object 70519 was a nice example of a hairpin.

Image: Photograph of the X-ray image of object 70519.
It is now in three long pieces, the laminating layers of corrosion having pulled away pieces of the remaining iron core. This leaves the core exposed to oxygen and moisture, which cause further rusting.

Image: Object 70519 after two years in storage. The plastic-like coating is the result of consolidation, which is discussed further below.
In these circumstances, it was necessary to consolidate all the finds before further handling or treatment.
We made up a solution of 5% Paraloid B-72, an acrylic adhesive, in acetone and poured just enough into glass dishes to cover the bottom of the finds. We placed these under a vacuum, which drew a thin layer of solution over the objects. This consolidates objects thoroughly while avoiding imparting a shine.

Image: Leonie pouring out the enormous volume of acetone necessary
to make up enough of the 5% solution needed to consolidate all the finds.

Image: Courtney modelling the huge mesh bag I stitched
to suspend the beads of Paraloid B-72 in the acetone to form the
adhesive solution.

Image: Some of the finds in glass dishes before the solution was added and they were placed under vacuum.

Image: Our lab vacuum box chamber with trays inside. The tin foil covering prevented
the acrylic solution from being drawn out of the tray under vacuum.
After allowing excess solution to run off, we placed the finds on silicone release paper inside fume cupboards to dry and allow the acetone to evaporate off safely.
Ethics and Aesthetics: Prioritising Objects for Cleaning and Further Treatment
Small iron archaeological finds are typically cleaned using air abrasion. This involves firing powder particles at high pressure at the surface of an object, using a unit like those used in dentistry. This removes layers of dirt and corrosion, revealing the object’s original shape, in a slow, controlled manner, reducing the risk of breakage.
Conservators normally remove corrosion down to the magnetite layer, a dull grey to black corrosion layer close to the metal core. This allows the shape of the original object to be revealed without exposing the reactive pure metal core to oxygen and water.

Image: Diagram (author’s own, 2022, based on Selwyn 2004, p.106) showing the layers making up corroded archaeological iron objects. The magnetite layer forms closely over the original iron surface.
This is a time-consuming process. To clean the over 100 iron objects entrusted to us would require resourcing and a timescale rarely available to even full-time professional conservators. Across conservation, it is necessary to prioritise the treatment of certain objects over others. This guarantees that the maximum amount of information is extracted.
My classmates and I made a shortlist of fifteen finds that we found particularly ‘interesting’.

Image: Our list of ‘Interesting’ objects, using their find numbers. As the key shows, circled numbers denote finds selected for the ‘super cut/high priority’ group (see below). ‘Mine!’ is next to find 70519, the corroded hairpin, because I was determined it could be saved.
These were finds we recognised from the X-rays taken by the previous students as uncommon in the context of the site and wider excavations of early medieval British sites.

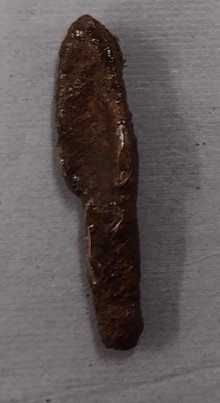
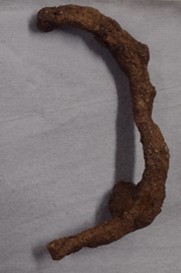
Image: (top to bottom) lock shackle; small scoop; handle. All are covered in a thick layer of corrosion.
For example, we chose a shackle of a padlock, a little scoop, and a handle. Cleaning these could reveal more about their purpose, and therefore information about contemporary technology and daily activities and uses of the site, than objects more common on this and other sites, like a nail.
This large bolt was also selected, as it was unique among our finds, and could evidence larger-scale construction taking place.

Image: Photograph of the large bolt, and a corroded fragment that had come away from the main object.
Re-X-raying
We also identified thirteen finds that were potentially interesting, but the X-rays had not revealed their shape in sufficient detail to be certain.

Image:Our list of find numbers to be x-rayed again, featuring notes on the issues with the previous x-ray to help us decide on kVs and exposure times for the new X-ray. Find 70519 was the hairpin was initially declared lost until consultation with Phil Parkes suggested it could be saved.
For example, the first X-ray suggested find 70438 was a curved iron bar.

Image: Photograph of the first X-ray of find 70438.
However, this photograph of 70438 (below) shows that the X-ray (above) does not reveal as much about the construction of the object’s ridged spine as X-rays from other angles could.

Image: Photograph of find 70438.
We X-rayed these finds again at a higher kilo voltage (kV) and longer exposure time, and 70483 from different angles.


Image: Leonie (left), Courtney (right background) and Tessa (right foreground) arranging finds and lead letters over the X-ray film.

Image: Lexie preparing to take a new X-ray.
The new X ray revealed that find 70621 had a deliberately made hole in the middle. This suggests it is not waste material from the manufacture of another object, but had its own function. 70583’s believed bolster or cross-guard was revealed to be dense corrosion near a contact point between two different metals, shown by the difference in brightness.

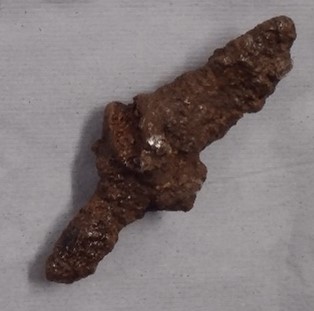
Image: Photographs of finds 70621 (top) and 70583 (bottom).

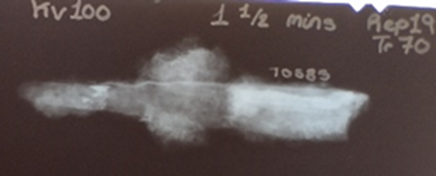
Image: Photographs of one of our new X-rays, showing the hole in find 70621 (top), and 70583’s bimaterial composition (bottom).
70483 was revealed not to be a solid bar, but a loop, crushed deliberately or from the weight of the ground over time.

Image: Photograph of the new X-ray of find 70438.
All thirteen finds were deemed interesting and were added to the ‘interesting’ shortlist.
Unboxing (and Re-boxing): Prioritising Objects Part 2
It was unlikely we would make it through twenty-eight finds in addition to a practice object and the other projects we were working on during the four-week placement.
I narrowed the now-longlist down to sixteen objects. I chose the most aesthetically pleasing and rarest objects in the context of our collection. As well as yielding the most information about the site, these would be the most interesting to the public, who might, in the future, come to see the finds on display. I christened this the ‘super cut/high priority’ list.
To help us keep track of which objects had been treated and by who, Tessa made a table assigning students to in-progress and completed objects.

Image: Tessa’s table, assigning objects to the seven students on placement.
The ticks to the right of find numbers represent fully air-abraded and readhered (where necessary) objects.
However, this did not speed up finding the objects we were currently treating in a box containing 130 others. To increase our efficiency, I separated the ‘work in progress’, ‘high priority’ and ‘interesting’ finds into separate boxes, adding bags of silica gel to limit corrosion caused by introduction of moisture and oxygen from regular opening and resealing.
Treatment Stage 2: Air Abrasion
It seemed advisable for us as students relatively inexperienced in air abrasion to practise cleaning down to the magnetite layer on less ‘important’ objects with similar corrosion patterns to the more significant finds.
There are an enormous number of nails surviving from the eras of Roman, Saxon and Viking occupation. Therefore, anything identified as a nail was designated an acceptable practice piece.

Image: My air abrasion ‘practice’ object, a short iron nail, before cleaning.

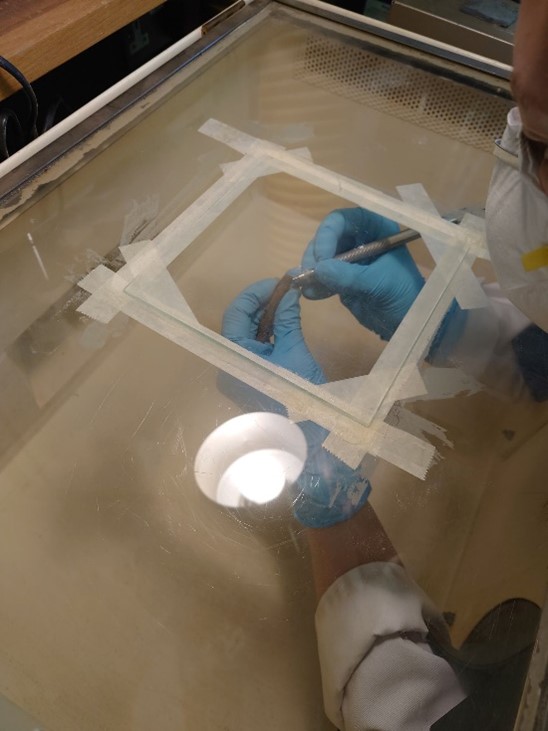
Image: Courtney (top) and Emma (bottom) air abrading iron finds.
Only a few of the ‘high priority’ objects were cleaned completely while we were on placement. However, our work prepared the way for air abrasion to continue after the summer break.
The digs at Repton also uncovered several ‘special’ finds, made of more precious metals and/or thought to be especially beautiful examples of Viking metalwork. You can learn about their conservation here: https://blogs.cardiff.ac.uk/conservation/conserving-viking-archaeology-part-2-treating-the-special-finds-from-the-site-of-the-great-army-encampment-at-st-wystans-church-repton/.
Further reading
Conservation
Interested in finding out more about what conservators do? Check out:
Mathiasson, J. and Rumsey, K. The C Word: The Conservators’ Podcast [Podcast]. Available at: https://thecword.show/.
Secrets of the Museum. 2020. BBC Two. Available at: https://www.bbc.co.uk/iplayer/episodes/m000f1xt/secrets-of-the-museum.
To find out more about how we use X-rays to interpret the condition and construction of metal objects:
Historic England. 2006. Guidelines on the X-radiography of archaeological metalwork. Swindon: English Heritage Publications. Available at: https://historicengland.org.uk/images-books/publications/x-radiography-of-archaeological-metalwork/xradiography/.
You can find out more about our work on the Repton finds, and about our work at Cardiff as conservators, on our social media!
@cuconservation
@c.in.conservation
@conservationkitty
@emmathomasconservation
@leonie.conservation
@sorcharibyconservator
@CUConservation
@cinconservation
@EmmaThomasCons
@leonieconserva
@Lexie_L67
@TMCorton
History and Archaeology
BBC. 2014. Viking Dig Reports. Available at: https://www.bbc.co.uk/history/ancient/vikings/dig_reports_01.shtml.
Butler. J. n.d. The Great Heathen Army. Available at: https://www.historic-uk.com/HistoryUK/HistoryofEngland/Great-Heathen-Army/.
Current Archaeology. 2019. Resolving Repton: A Viking Great Army winter camp and beyond. Available at: https://archaeology.co.uk/articles/features/resolving-repton.htm.
Hadley, D. and Richards, D. 2021. The Viking Great Army and the Making of England. London: Thames & Hudson.
Jarman, C. 2021. River Kings: A New History of the Vikings from Scandinavia to the Silk Roads. London: HarperCollins.
Levine, J. 2022. Digging Up the Rich Viking History of Britain. A massive 1,100-year-old graveyard leads to a surprising new view of the Nordic legacy in Britain. Available at: https://www.smithsonianmag.com/history/digging-up-viking-history-britain-180979790/.
Richards, J. 2021. The Viking Great Army: the latest discoveries. History Extra [Podcast]. 7 July 2021. Available at: https://www.historyextra.com/period/viking/viking-great-army-latest-discoveries-podcast-julian-richards/.
The British Museum. 2022. Portable Antiquities Scheme. Available at: https://finds.org.uk/ – This scheme records archaeological objects discovered by the members of the public in England and Wales on a searchable database.
University of Nottingham. 2022. Vikings in the East Midlands. Available at: https://emidsvikings.ac.uk/.
All images belong to me or the other students who worked with me on the Repton finds, unless stated otherwise.
- March 2024 (1)
- December 2023 (1)
- November 2023 (2)
- March 2023 (2)
- January 2023 (6)
- November 2022 (1)
- October 2022 (1)
- June 2022 (6)
- January 2022 (8)
- March 2021 (2)
- January 2021 (3)
- June 2020 (1)
- May 2020 (1)
- April 2020 (1)
- March 2020 (4)
- February 2020 (3)
- January 2020 (5)
- November 2019 (1)
- October 2019 (1)
- June 2019 (1)
- April 2019 (2)
- March 2019 (1)
- January 2019 (1)
- August 2018 (2)
- July 2018 (5)
- June 2018 (2)
- May 2018 (3)
- March 2018 (1)
- February 2018 (3)
- January 2018 (1)
- December 2017 (1)
- October 2017 (4)
- September 2017 (1)
- August 2017 (2)
- July 2017 (1)
- June 2017 (3)
- May 2017 (1)
- March 2017 (2)
- February 2017 (1)
- January 2017 (5)
- December 2016 (2)
- November 2016 (2)
- June 2016 (1)
- March 2016 (1)
- December 2015 (1)
- July 2014 (1)
- February 2014 (1)
- January 2014 (4)