Mask on, Mask off: Masking Films from X-radiation
8 January 2020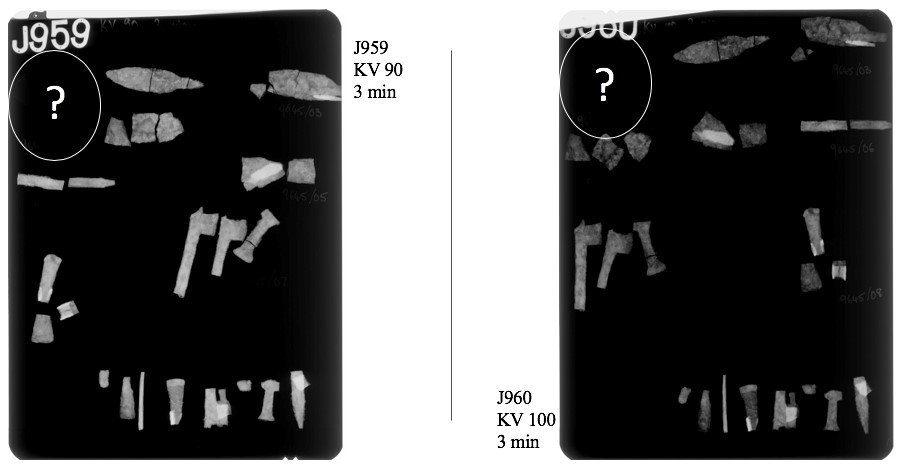
So, I spent an hour and forty minutes X-raying my objects and developing the films. When they were finally dry, I laid them on the lightbox to see them for the first time; I had never X-rayed or developed films before so at first glance I was quite pleased with the results until… “wait, what is that empty space in the corner of my film?!” *sigh* Just as I thought I had completed the process without any blunders, I had clearly made a mistake. Just to be sure though, I counted the objects and sure enough, one of them definitely has NOT shown up. I referred back to the sheet of paper that I had used to trace my objects on before they went into the X-ray machine, and there it was! I HAD traced around the object! So then why wasn’t it showing up?
X- Radiography- a quick overview
X-rays are a type of radiation; they are invisible, they penetrate matter, and like light, they darken photographic film. Simply put, the object is placed on top of the film and the X-rays are fired at it; if the object is thick or high in density, it absorbs the rays and doesn’t let them hit the film and so it shows up white on the X-rays. If you’ve ever had an X-ray at the hospital, this is the same as your bone showing up white on the film; your bone is dense, so it appears white. If the object is thin or low in density, then the X-rays can pass through it and cause a chemical reaction in the film behind it which darkens it to the shape of the object.
I won’t be going into detail on the X-radiography and developing processes, but if you want to read more about this, check out Stephanie Whitehead’s blog at: https://blogs.cardiff.ac.uk/conservation/2016/11/23/looking-beneath-the-layers/.
Back to the missing object!
For a bit of an introduction, the objects that I had been given to treat were a group of Meroitic copper model tools from the Egypt Centre in Swansea. My “missing object” was sent to us in this group; unlike the others though, it is a thin sheet of metal. After realising that this was the missing object, I took a closer look at it and concluded that this was a result of overexposure.
All those dials and buttons on the X-ray machine can seem scary at first, but we only have to worry about the kilovoltage (kV) and time. I had done two X-rays of my objects, one at 90 kV and the other at 100 kV, both set for 3 minutes. This kV was suitable for the thick model tools, which absorbed some of the X-rays, but for the fine sheet of metal it was far too high, the X-rays had passed straight through it and darkened the film, thus overexposing it.
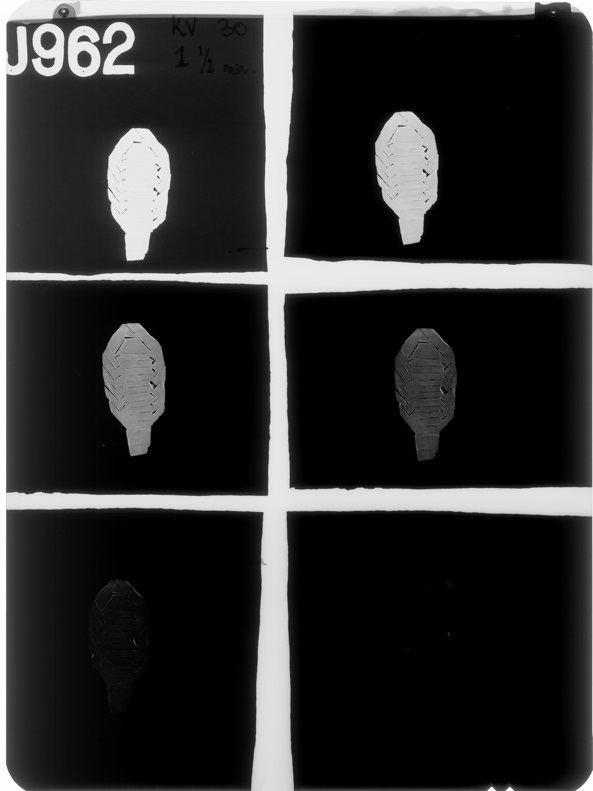
Although I was initially bothered by the situation, I started to see it as an opportunity to learn about “masking off” (more on that in a moment). I was now curious about this object and wanted to know exactly what kV was needed for it to show up. I decided to take multiple exposures of the object at 30, 40, 50, 60, 70, and 80 kV’s, each for 1 and a half minutes. My object was so small, it would have been wasteful to use one film per exposure and so I used sheets of lead to mask off areas of film that I didn’t want exposed, meaning that I could have all 6 exposures on a single radiographic film, AKA, “masking”.
Masking off
As the X-ray machine was warming up, I went to the dark room to place the film into the cassette. We have a choice of hard box cassettes or soft plastic ones; I prefer the soft ones as once the film is inside you can vaguely feel where the film lies inside it. This is helpful to know because you don’t want to place your objects past the edge of the film where they will be cut off in the image. After closing the cassette, I took it back up to the X-ray room and started with the logging process which entailed:
- Numbering my film according to the logbook
- Recording the kVs and times that I will use
- Details of what I am X-raying
- My object’s lab number
- My initials and the date
Earlier in this blog I mentioned the sheet of paper that I traced my objects on. This paper is laid on top of the cassette (and remains on it throughout the X-raying process), and on top of that, characters (letters and numbers) made out of lead are used to spell out the film number that I was allocated from the logbook. This is so that once the film is developed, I know exactly which one it is and all the details pertaining to it.
WARNING! Lead is toxic so please make sure to wear gloves when handling it!
I drew a 2 x 3 grid on the paper to allow for the 6 different kV’s that I would be exposing my object to and this acted as a guide for where I need to place my lead sheets, and to avoid confusion I noted the kV’s in each square of the grid.
I placed my object in the section that I wanted exposed, masked off the rest of the cassette with lead sheets, placed it in the x- ray machine, and exposed it to the relevant kV of X-rays. After this was complete, I moved my object over to the next section in the grid, masked off the rest of the cassette (make sure to mask the part that you just exposed!) and repeated the process.

Marking out the grid on the paper is helpful for a neat image because you can make sure that you’re lining up the lead sheets right up to the lines and not overlapping them in-between exposures as this will lead to white cut-off lines where the film has not been exposed. Sadly, even with my drawn-up lines, I was not precise enough in my masking and as you can see, I’ve got some pretty distracting white lines. I’m making these mistakes so that you don’t have to! Anyway, I continued this process of masking for all six exposures, turned off the X-ray machine, cleared up the room (remember guys, a tidy lab is a safe lab), and went to develop my film.
Once my film had been developed and dried, I placed it on the light box and was pleased to see that the multiple exposures had come out nicely, with the 50 and 60 kV exposures showing the best detail in the metal sheet. I found that masking was a quick and effective way to take multiple exposures; not only was it conserving expensive film plates, it showed different details in each exposure which led to a better understanding of my metal and the composition of the object itself.
References
Cervantes, G. A. 2016. Technical fundamentals of radiology and CT. Bristol: IOP Publishing.
Egypt Centre collections search http://www.egyptcentre.org.uk/index.asp?page=item&mwsquery={Identity%20number}={EC686}
Fell, V., Mould, Q., White, R. 2006. Guidelines on the x-radiography of archaeological metalwork. Swindon: English Heritage.
Film processing. Available at: https://www.nde-ed.org/EducationResources/CommunityCollege/Radiography/TechCalibrations/filmprocessing.htm Accessed: 04/01/2020.
Middleton, A. & Lang, J. 2005. Radiography: theory. In Tum, J. and Middleton, A. eds. Radiography of Cultural Material Edition 2. London: Elsevier, pp. 1- 20.
- March 2024 (1)
- December 2023 (1)
- November 2023 (2)
- March 2023 (2)
- January 2023 (6)
- November 2022 (1)
- October 2022 (1)
- June 2022 (6)
- January 2022 (8)
- March 2021 (2)
- January 2021 (3)
- June 2020 (1)
- May 2020 (1)
- April 2020 (1)
- March 2020 (4)
- February 2020 (3)
- January 2020 (5)
- November 2019 (1)
- October 2019 (1)
- June 2019 (1)
- April 2019 (2)
- March 2019 (1)
- January 2019 (1)
- August 2018 (2)
- July 2018 (5)
- June 2018 (2)
- May 2018 (3)
- March 2018 (1)
- February 2018 (3)
- January 2018 (1)
- December 2017 (1)
- October 2017 (4)
- September 2017 (1)
- August 2017 (2)
- July 2017 (1)
- June 2017 (3)
- May 2017 (1)
- March 2017 (2)
- February 2017 (1)
- January 2017 (5)
- December 2016 (2)
- November 2016 (2)
- June 2016 (1)
- March 2016 (1)
- December 2015 (1)
- July 2014 (1)
- February 2014 (1)
- January 2014 (4)