A tale of mystery mould and cautious culturing
30 April 2019
The following object started off as a bit of a mystery, fully wrapped in tissue paper and plastic sheeting, labelled as covered in mould, and described in the paperwork as a basket from Bristol Museum, previously in the British Empire and Commonwealth collection. As a conservator I use my senses to investigate the objects that we treat, so it felt strange to begin my research without seeing or touching the object first.
Mould often makes us think of the green splodge in the jam that went off in the fridge (think of the scones that could have been enjoyed!) but how does it get there in the first place? It is useful to think about the environment in which the object has lived. As well as the gases that create the atmosphere there are particulates (tiny solid particles), including mould spores that land on the object.
Initial research
Although I was intrigued as to what lay beneath the packing materials, my first thread of research was to look at the risk assessment in the lab. A risk assessment identifies problems, and then reduces them to a safe level using different procedures. Exposure to mould in large quantities and for long durations can lead to sensitisation of the respiratory system and related health conditions. Objects are sealed in polythene wrapping to reduce the health risk and prevent cross contamination with other objects. My research covered mould in relation to heritage objects, as well as the history of this basket. Unfortunately, the object information has become dissociated and the museum is working on piecing together the records.
For my initial observations I opened the packaging in a fume cupboard, wearing personal protective equipment – lab coat, FFP3 face mask and nitrile gloves. I partially unwrapped the basket, so I could see the object had two hemispheres made from a dark wood with carved decoration. The mould was dry; a powdery pale green, that I estimated covered 50% of the surface area. I learnt that future treatment would require a larger workspace and resealable packing.
Treatment – Stage one
I now had to decide if I was going to sample and culture the mould to identify it, and whether this would inform my treatment. My reading had highlighted two differing views: those who thought identification should be made before proceeding and those who advocated that in smaller incidences identification was unnecessary (CCI, 2017 and Florian, 2002). My instinct was to move forward with the removal of the mould, as I was daunted by the technicalities of culturing and identification. After a conversation with Phil Parkes, I decided to take samples using sterile cotton swabs before brush vacuuming the basket to remove the majority of the visible mould. This would allow me to culture at a later date while not delaying the treatment of the object.
Research – Culturing Mould
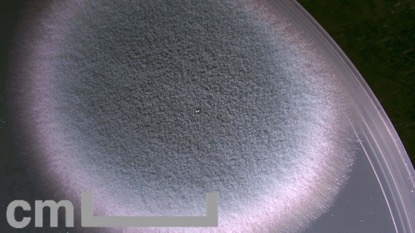
Sampling for mould can be achieved using different methods. I decided to use cotton swabs that I would then roll over the surface of a culturing medium and enable visual identification. There are limitations to sampling this way; spores from a specific time cannot be isolated so the results will show what has accumulated over time. Also not all moulds grow on all mediums, I chose Potato Dextrose agar (PDA) medium because it supports the growth of both Aspergillus and Pencillium. It was important to keep the mould cultures isolated to prevent contamination of the experiment and minimise the risk to people and other objects. Research into culturing showed that an incubation period of 7 days, with a relative humidity of 70% or above and temperature between 20-35°C was required. I ran a trial to see if a 13 litre plastic box would provide the right conditions, using a Tinytag monitor to gather the environmental information. The data showed that the box could maintain the temperature and humidity required.
The cultures were visually checked every day and as the week went on there were no signs that any of the ten petri dishes were going to be successful, but on the final day, and to my surprise, three of the dishes had growth on the surface. Inspection under the microscope revealed that two had the correct characteristics for mould; circular growth patterns with the hyphae on the outer edges. Further research into the characteristics of mould grown on PDA, led me to think that this was a Penicillium spp. It was useful to culture the mould, as I now understand the process from the practical side as well as the theoretical.
Find out how my treatment progressed by reading part two.
- March 2024 (1)
- December 2023 (1)
- November 2023 (2)
- March 2023 (2)
- January 2023 (6)
- November 2022 (1)
- October 2022 (1)
- June 2022 (6)
- January 2022 (8)
- March 2021 (2)
- January 2021 (3)
- June 2020 (1)
- May 2020 (1)
- April 2020 (1)
- March 2020 (4)
- February 2020 (3)
- January 2020 (5)
- November 2019 (1)
- October 2019 (1)
- June 2019 (1)
- April 2019 (2)
- March 2019 (1)
- January 2019 (1)
- August 2018 (2)
- July 2018 (5)
- June 2018 (2)
- May 2018 (3)
- March 2018 (1)
- February 2018 (3)
- January 2018 (1)
- December 2017 (1)
- October 2017 (4)
- September 2017 (1)
- August 2017 (2)
- July 2017 (1)
- June 2017 (3)
- May 2017 (1)
- March 2017 (2)
- February 2017 (1)
- January 2017 (5)
- December 2016 (2)
- November 2016 (2)
- June 2016 (1)
- March 2016 (1)
- December 2015 (1)
- July 2014 (1)
- February 2014 (1)
- January 2014 (4)