A Picture is Worth a Thousand Words (Glass Plate Negative Conservation)
1 April 2020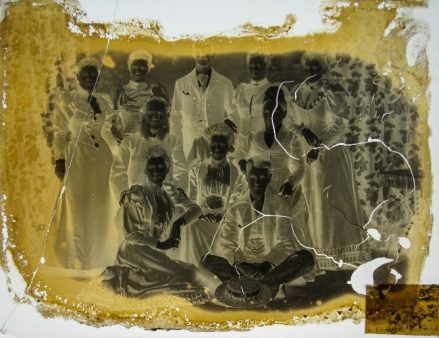
I’ve always been fascinated with the process of developing negatives and film photography, so when I had to opportunity to pick the material type of my next object while studying Conservation at Cardiff University, I knew it had to be something photographic. To my delight, and possibly fright, I received a glass plate negative in dire need of conserving from the Brecknock Museum and Art Gallery.
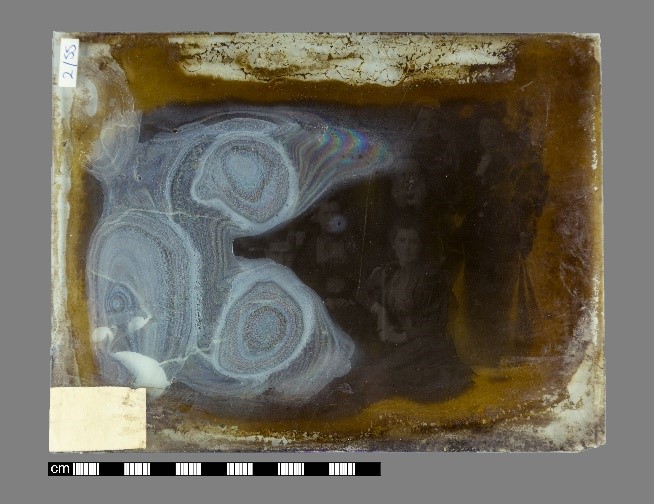
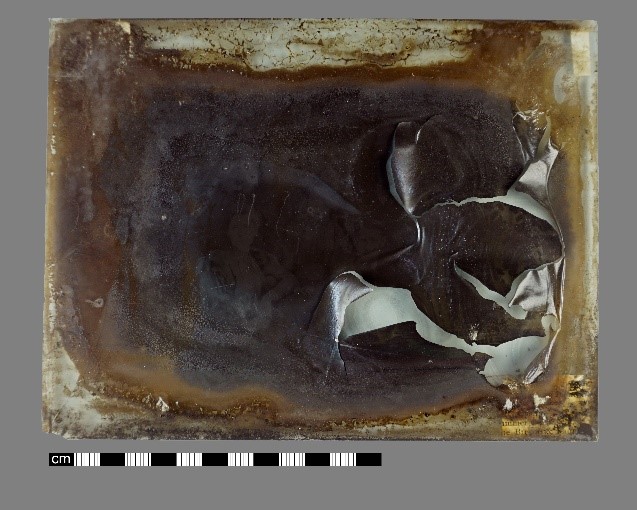
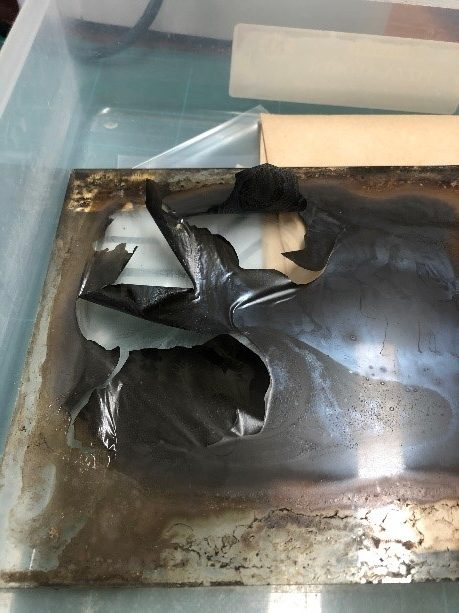
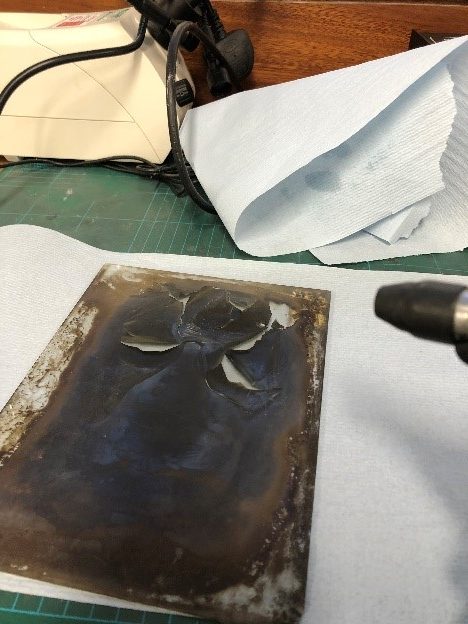
The emulsion had begun deteriorating and shrinking inward on all sides, and a large area had begun to peel away from the glass below. The adhesion of the emulsion to the glass is affected greatly by fluctuations in relative humidity, causing rapid shrinkage and expansion that can crack and lift it away from the glass its mounted to. It was my job to find out what type of negative it was and how to fix it.
Luckily, Cardiff is equipped with a Fourier-transform infrared (FTIR) spectrometer. This machine fires a range of wavelengths of light, and records how much light the sample absorbs at those various wavelengths. The wavelengths at which the light is absorbed at gives hint to its molecular structure and bonds, and from this we can conclude what the object might be made of. After running a FTIR test on the emulsion side of the negative, I found it to be mainly composed of gelatin.
There are two main types of glass plate negatives: Wet and Dry.
Albumen on glass was one of the earliest techniques, developed in 1848. The process involved coating a glass plate with white of egg, sensitized with potassium iodide, washed with an acid solution of silver nitrate, and developed with gallic acid. The exposure had to be from 5 up to 15 minutes (so no portraits!) and the plates would only last a fortnight.
Soon after, in 1851, the wet collodion method was invented. This process involved pouring potassium iodide onto the glass, tilting it around until fully coated, and then dipping in a bath of silver nitrate. The plate had to be exposed to the desired image while still wet, so the process had to be done on the spot, and developed right after with a portable dark room, making the whole process very complicated and inconvenient for photographers.
In 1871, the dry gelatin method was created. This involved soaking gelatin in water, adding cadmium bromide in solution, and then silver nitrate. The reaction forms silver bromide crystals suspended in the gelatin. The emulsion is then flowed onto the glass to dry, binding the emulsion to the glass via the gelatin. The plate was dry and could be mass produced, meaning photographers no longer needed the portable dark room, as the plates could be bought ready-made and transported ready to use on the spot.
Knowing the composition of the plate helped me decide what to do next. First, the whole plate needed a general cleaning. This involved swabbing the glass side with a mix of water and ethanol (50:50), as well as removing any unwanted stickers and their residues. The image side required cleaning as well. Humidity most likely caused the problem, so it was important to keep water away and do as much as possible just with brushes and bulb blowers. If any fibers and residues had stuck to the emulsion, they were carefully removed with mechanical cleaning as well.
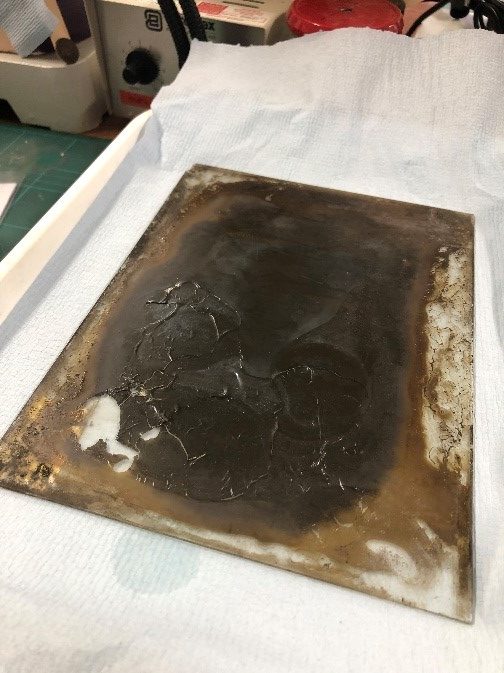
Now that the cleaning was finished, the next step was re-adhering of the emulsion back to the glass plate. As the silver bromide solution was originally bound to the plate via gelatin, the solution is to apply it back to the surface with another gelatin solution.
To relax the peeling emulsion, I used a preservation pencil. The tool allows you to control the amount of water, the size of the water droplets coming out, as well as the temperature, to allow for a fine tuning and controlled application to objects that either need cool water vapor or very little humidity.
While the emulsion was relaxed, I used a solution of 10% gelatin (conservation grade) in water, painting it onto the glass underneath the peeled emulsion. Afterwards I gently massaged the emulsion to make sure the gelatin is spread evenly. And finally, I left a weight on the object to hold the emulsion down and ensure it binds back to the glass surface.
The main purpose of conserving photographs and negatives is to ensure the captured image will continue to exist and be preserved. The process usually ends with the digitization of the image, which I have included below.

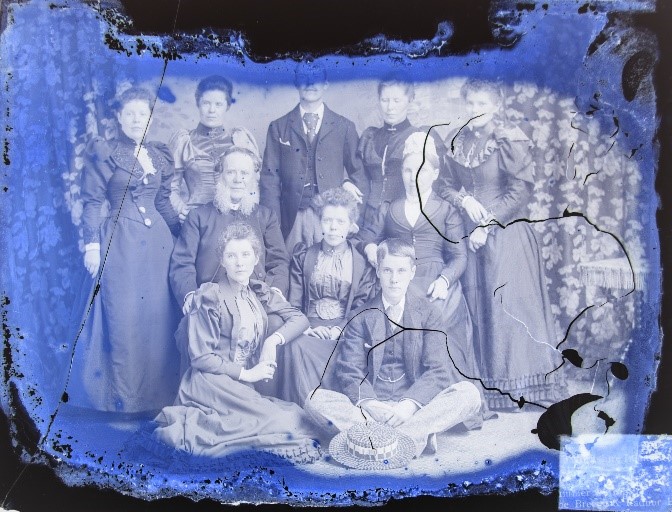
According to the Brecknock Museum, the portrait was most likely taken by Jack Clark, who opened a photography studio in 1905 in Brecon. The paper attached to the bottom corner mentions the Brecon Radnor Express, a newspaper that was published from 1912 to 1933 in the borough and county of Brecon, possibly dating the negative further.
Who were they? Was this a family portrait? I like to think so!
References:
Hendriks, K.; Iraci, J. (1986). Care of Black-and-White Photographic Glass Plate Negatives – Canadian Conservation Institute (CCI) Notes 16/2. [online] Government of Canada. Minister of Public Works and Government Services Canada. https://www.canada.ca/en/conservation-institute/services/conservation-preservation-publications/canadian-conservation-institute-notes/care-black-white-photographic-negatives-glass-plate.html [Accessed 3 February 2020].
Hernsheim, H. (1986). A Concise History of Photography. New York. Pgs 16-18
Hill, G. (2018). Caring for photographic materials. [online]. Government of Canada. Minister of Public Works and Government Services Canada. https://www.canada.ca/en/conservation-institute/services/preventive-conservation/guidelines-collections/photographic-materials.html#a4b3 [Accessed 3 February 2020].
Newhall, B. (1982). The History of Photography: from 1839 to the present. New York. Pg 123
Whitman, K. (2007). Preservation of Glass in Photographic Materials. [online} AIC Wiki. Available at http://www.conservation-wiki.com/wiki/PMG_Preservation_of_Glass_in_Photographic_Materials [Accessed 3 February 2020].
Comments
2 comments
Comments are closed.
- March 2024 (1)
- December 2023 (1)
- November 2023 (2)
- March 2023 (2)
- January 2023 (6)
- November 2022 (1)
- October 2022 (1)
- June 2022 (6)
- January 2022 (8)
- March 2021 (2)
- January 2021 (3)
- June 2020 (1)
- May 2020 (1)
- April 2020 (1)
- March 2020 (4)
- February 2020 (3)
- January 2020 (5)
- November 2019 (1)
- October 2019 (1)
- June 2019 (1)
- April 2019 (2)
- March 2019 (1)
- January 2019 (1)
- August 2018 (2)
- July 2018 (5)
- June 2018 (2)
- May 2018 (3)
- March 2018 (1)
- February 2018 (3)
- January 2018 (1)
- December 2017 (1)
- October 2017 (4)
- September 2017 (1)
- August 2017 (2)
- July 2017 (1)
- June 2017 (3)
- May 2017 (1)
- March 2017 (2)
- February 2017 (1)
- January 2017 (5)
- December 2016 (2)
- November 2016 (2)
- June 2016 (1)
- March 2016 (1)
- December 2015 (1)
- July 2014 (1)
- February 2014 (1)
- January 2014 (4)
Have you thought about doing any digital reconstruction of the image?
I’ve thought about it, but haven’t actually researched the process itself. I would love to have a restored image along side the fixed plate