The Application of Commercial Taxidermy Classes to the Conservation of Historical Taxidermy
18 January 2023Content Warning: This blog post contains a frank description of taxidermy, including photographs of skinning and mounting animals. If this is not something that you are comfortable with, please do not continue past this point.
The Application of Commercial Taxidermy Classes to the Conservation of Historical Taxidermy
The first project of my second year is to condition report and possibly repair eleven taxidermy birds from Tenby Museum. I know what you are thinking, wow Emma, that is a lot of birds. You are right, and I was stubborn and determined to get all birds back home together.
Now I had never even touched a taxidermy before I got hold of these, so I really was starting from scratch when it came to repairing them. And as all conservators know, repairing cannot happen until you fully understand an object. After reading all that I could, I did not feel as though I could fully understand the construction of a taxidermy animal, nor the risks and dangers that could occur during their creation. So I set about finding myself a taxidermy class. I did find a class being run by a fantastic taxidermist and conservator, but this was not one that I was able to afford on my current budget (but definitely one I plan to attend one day!). The next best thing was a commercial class aimed at beginners looking to get their start as hobby taxidermists. So I hassled two of my cohort until they agreed, and then booked I us tickets.
On the approach to the date, we were given a choice between a rat, a guinea pig, or a rabbit. I had decided on the rat, so this is the process that we will concentrate on throughout this blog, although there is very little difference when considering other animals.
Let’s Break It Down
Firstly, a quick rundown for those who need to be made aware of the process of turning a dead animal into a mounted taxidermy.
- Cut into the animal down the animal length ways where it would most easily be hidden eg. down the stomach.
- Loosen the skin from the body by running fingers underneath the skin and above the muscles.
- Pull this back for access all the way around, and to the middle of the skull and the base of the tail.
- Remove arms and legs from the sockets and the main body. And cut through the base of the body and the middle of the skull, leaving the animal’s muzzle (or beak) in place.
- Remove as much of the muscle from inside the animal as possible, including on the legs, using borax salts to dry any remaining flesh inside the animal, such as the internal base of the tail or inside of the skull.
- Wash and clean the skin.
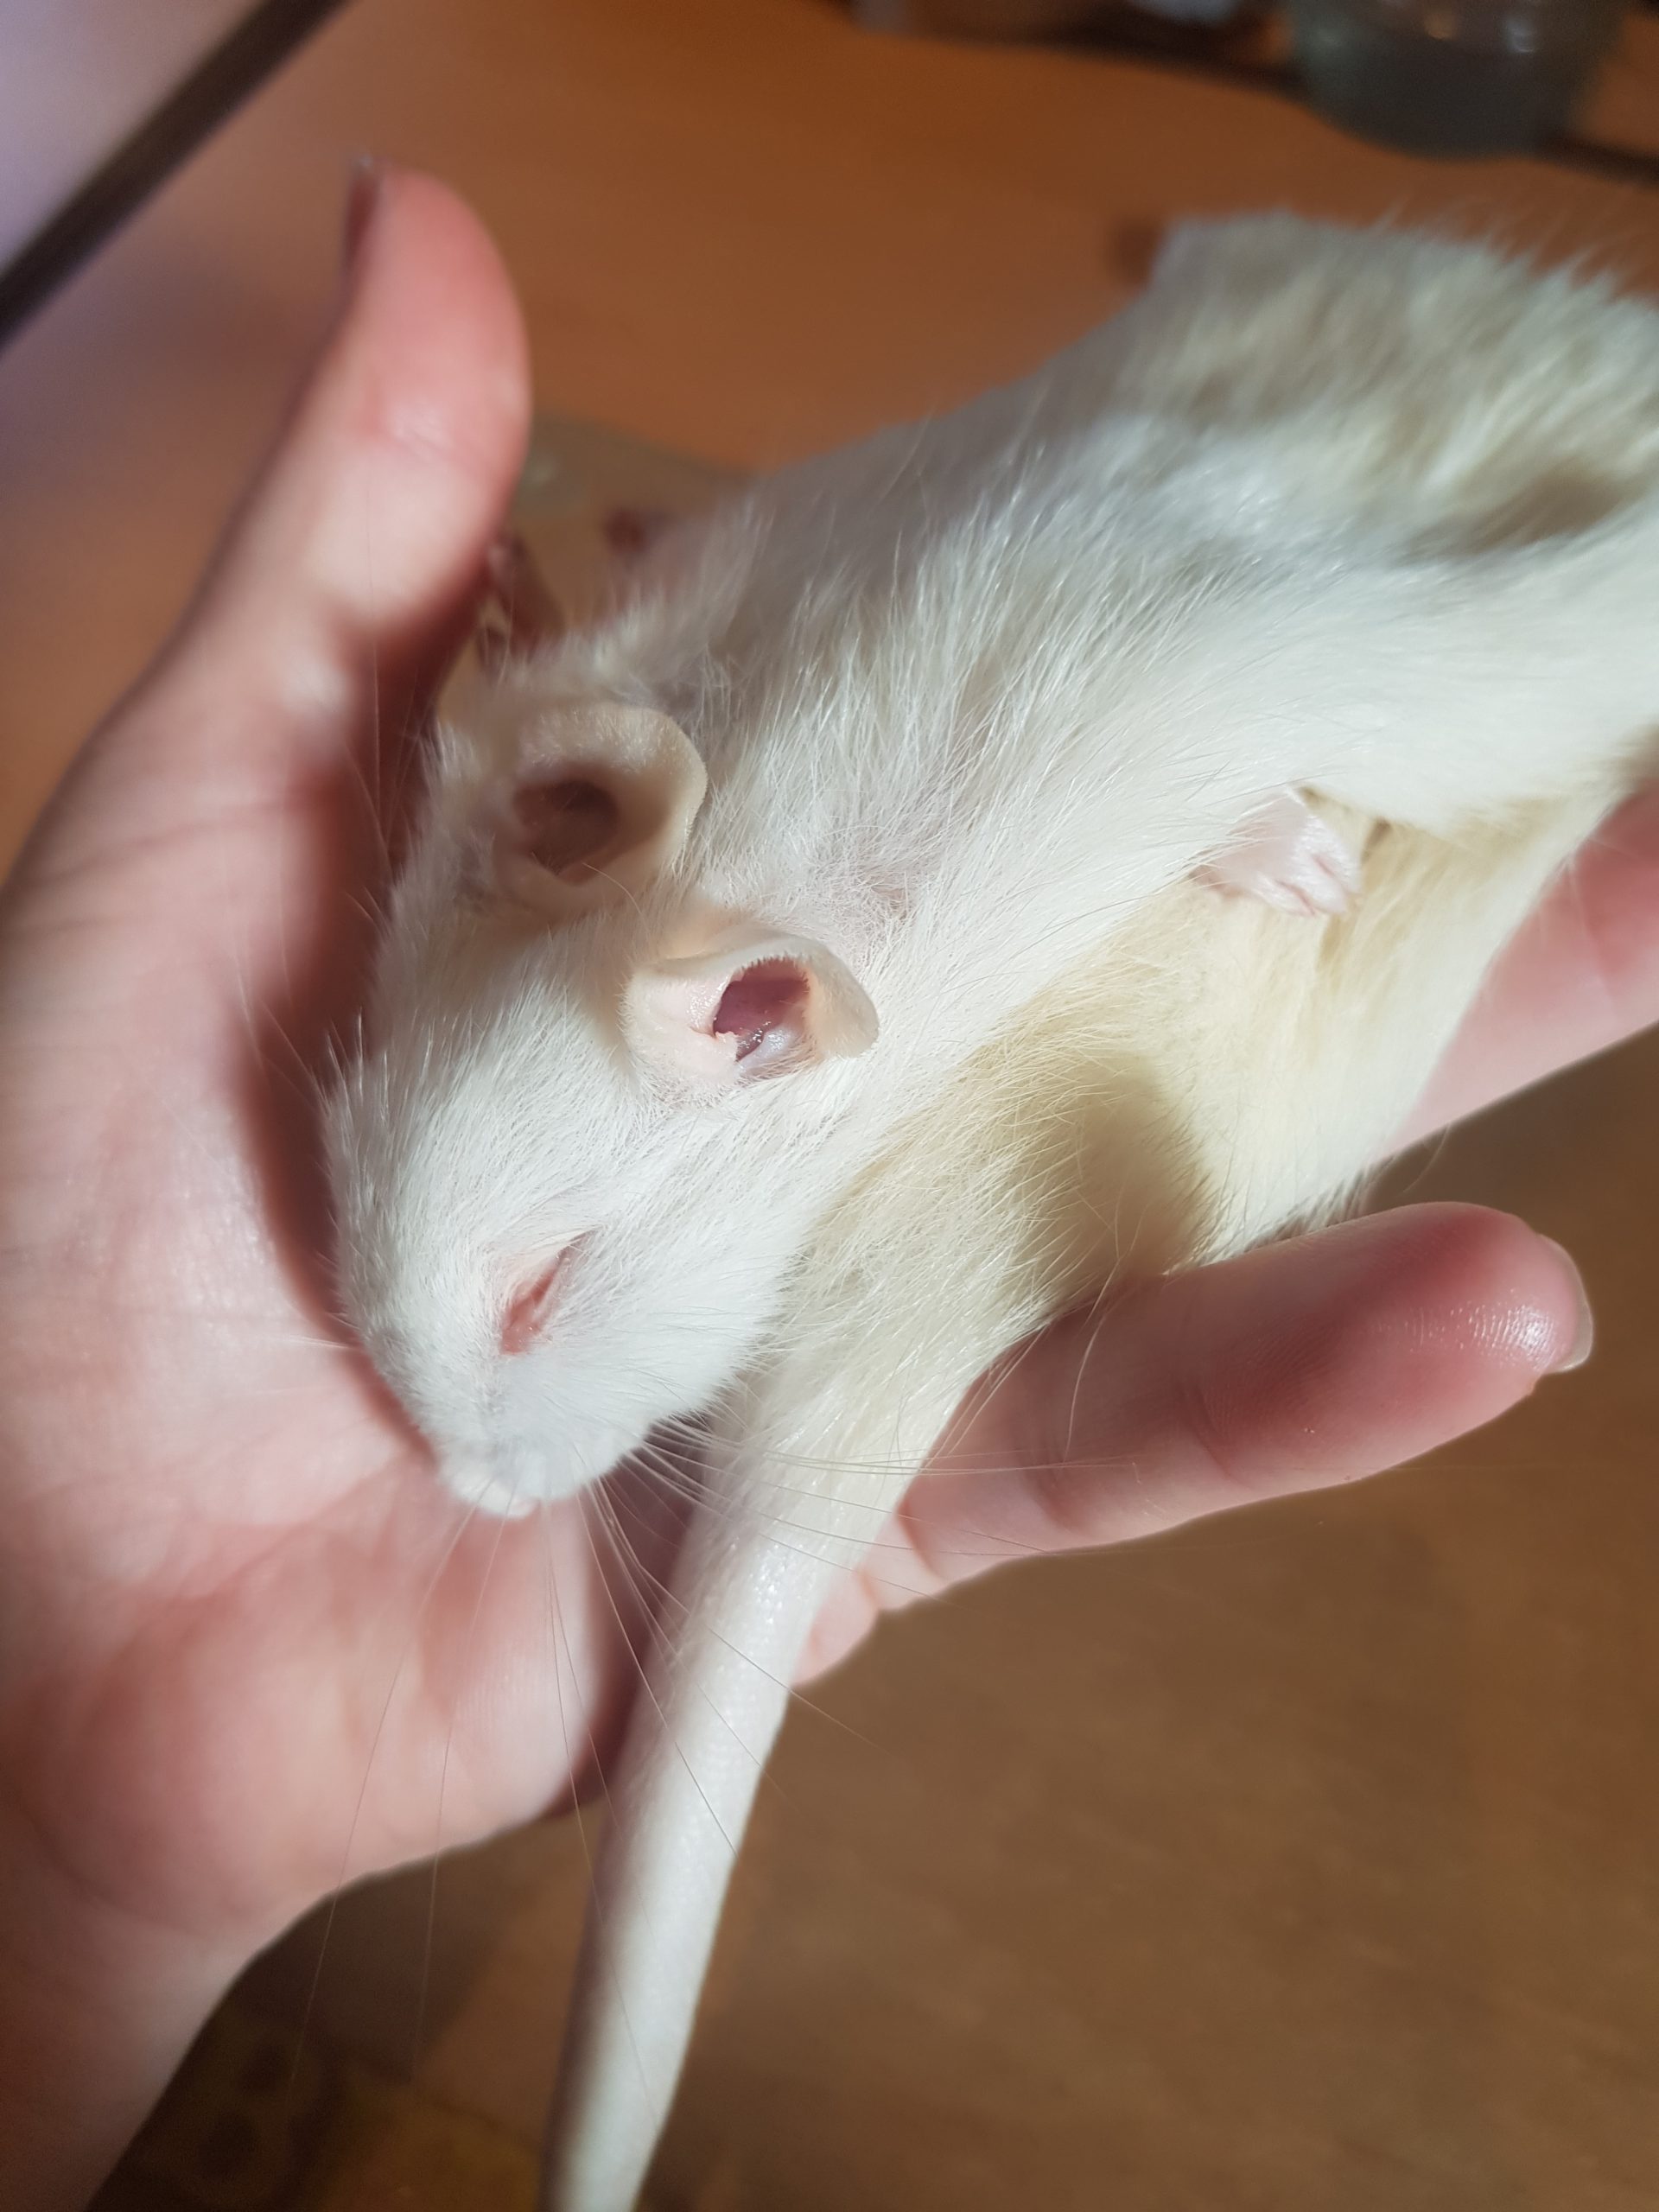
(Rat skin, Authors Own 2022) - Tanning liquid is applied to the inside of the skin, and allowed to dry off.
- Add mounting materials to the skin. Some pre-made mounts are available, but wood wool works just as well, with cotton wool to bulk areas of curves.
- Wires are inserted and coming out through each end of the animal, and through each of the legs, coming out as close to the pad of the paw as possible.
- The skin can be sewn back up, using a zigzag pattern to reduce the tension on the skin and reduce the likelihood of damage when the skin is sewn shut.
- Pushing the skin back, you can cut the wire so that it is no longer visible. You can now pose your taxidermy!
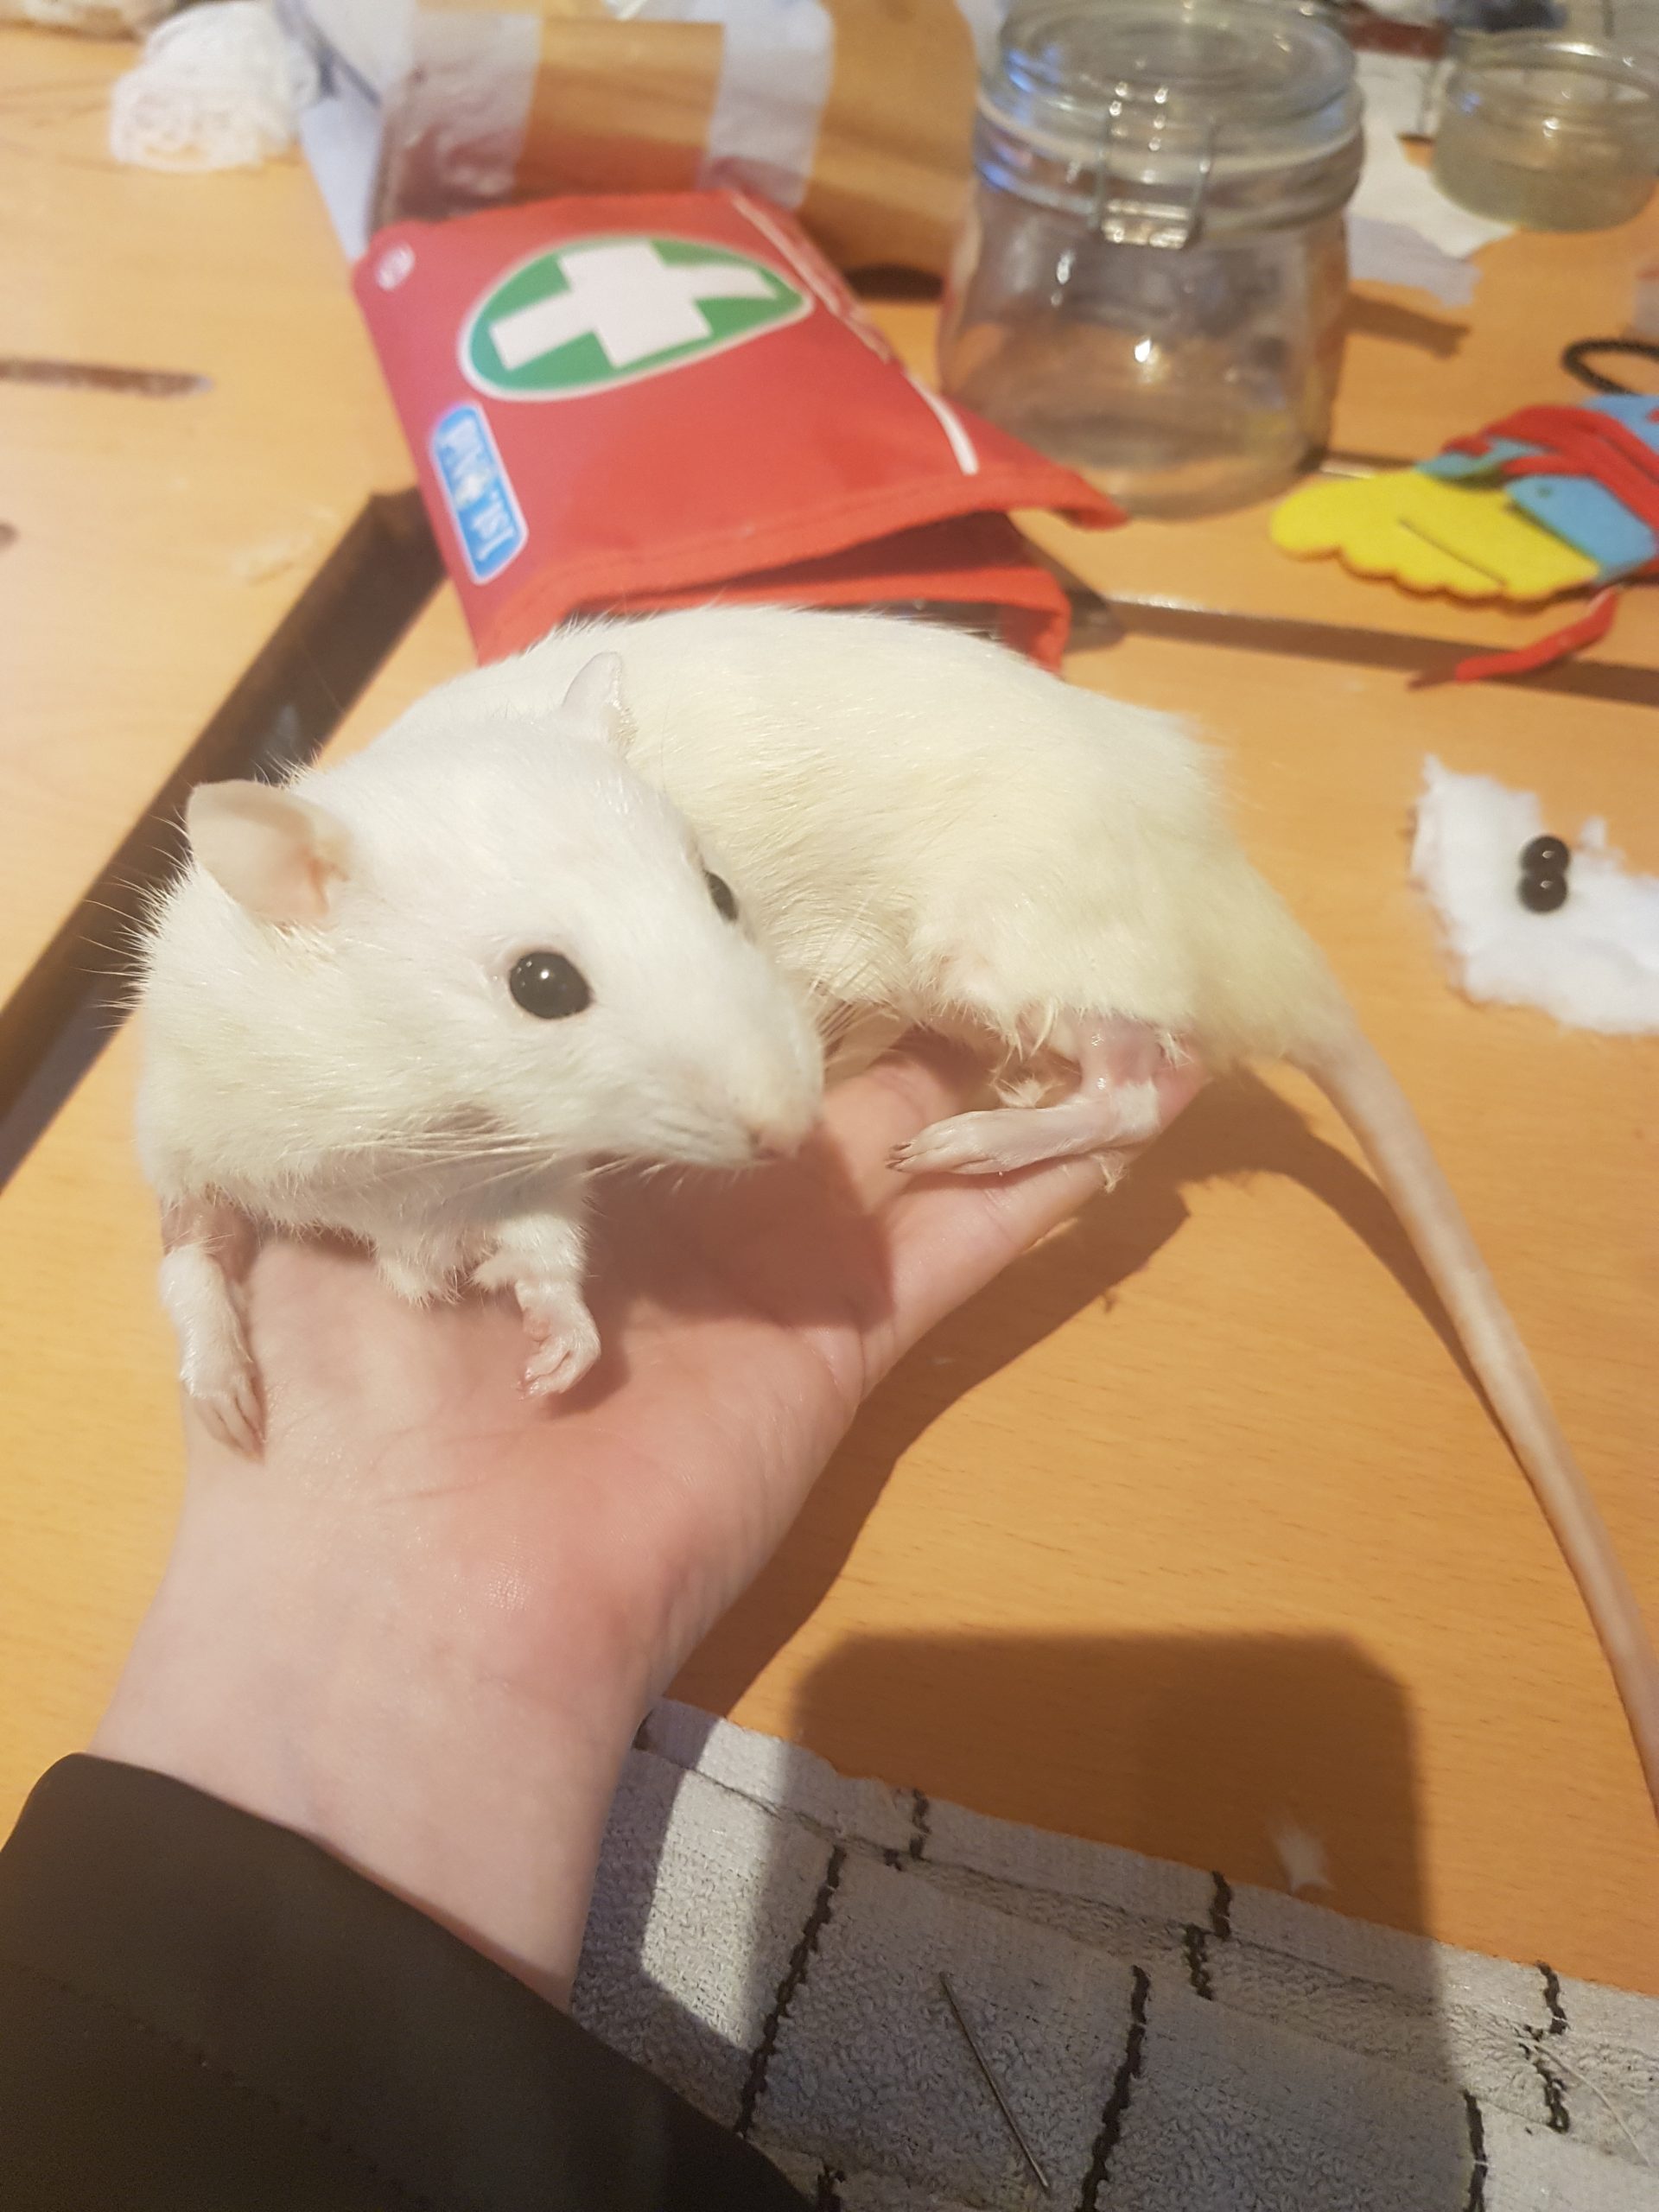
Wonderful, now we are all up to speed, and you can meet my new companion, Milly (short for Mildred).
Is It Really Helpful?
Now, much of museum taxidermy was done no later than the 1980s/90s, meaning that there is no guarantee that the modern way of mounting taxidermy skins is the way that it was done before, however, it does give a good background on their construction.
From comparing the bird taxidermy and the one that I created myself, I was able to discover some of the materials used were very similar, if not the same. Let’s break this down:
-
- Tanning – There is no way to know exactly what the inside of these birds was tanned with, however being able to identify how well-tanned they are is valuable. Whilst at the class, we were shown how to identify well-tanned skin, by pressing into the skin and feeling the firmness, sometimes accompanied by a small ‘click’. Knowing this can avoid any nasty surprises when it comes to the degradation of the skins.
- Stuffing – The Goosander from the Bristol collection has lost its tail. This meant that I have been able to extract a small sample of the stuffing; something I wouldn’t have been able to do otherwise. Preliminary identification looks to be wood wool, which is what I used in the rat, although in a different form. The wood wool I used was in long strips, whereas the stuffing of the Goosander was broken into small pieces. While these are similar, they are not identical. I believe them both to be wood wool, but microscopy will be used to confirm this. While this is not particularly useful for these repairs, it is always useful to know for the future.
- Wire – This is once again very much a ‘well it looks like this..’. The wire that we used in the class was a standard steel wire purchased on eBay. This was cut into sections and used to style the animal into the necessary shape. Without testing, I am not able to say for certain what was used, but considering that the wire in the birds is not corroded (which can be seen through the use of X-rays), it is possible that these too are steel.
That’s not to say that all of the materials used were the same, of course. Apart from the fact that I have not yet been able to confirm the materials are the same except through visual identifications of similarities, there are also other items that were evidently different. For example, one of the birds stands on a mount made of what appears to be driftwood or a foam-based recreation. Secondly, we used standard black beads for the eyes of our taxidermy. The birds each have anatomically correct eye beads used, which is important when striving for scientific accuracy.
In terms of the actual process, I did find the taxidermy class helpful. It allowed me to identify areas that I needed to check, including the stitches through the opening cut, and the placement of the metal wiring against bones.
The stitches were something that I would never have considered before this class. Sure, I knew that these animals had been stuffed somehow but the actual how and where of it never occurred to me. Neither did the idea that these stitches could weaken as the bird aged.
The investigation into the wires was one of the most interesting parts of condition assessing these birds. It was identified almost right away that the legs were an area of concern for almost all of the birds. Many of them had lost much of the skin on their legs, such as this Goosander below:
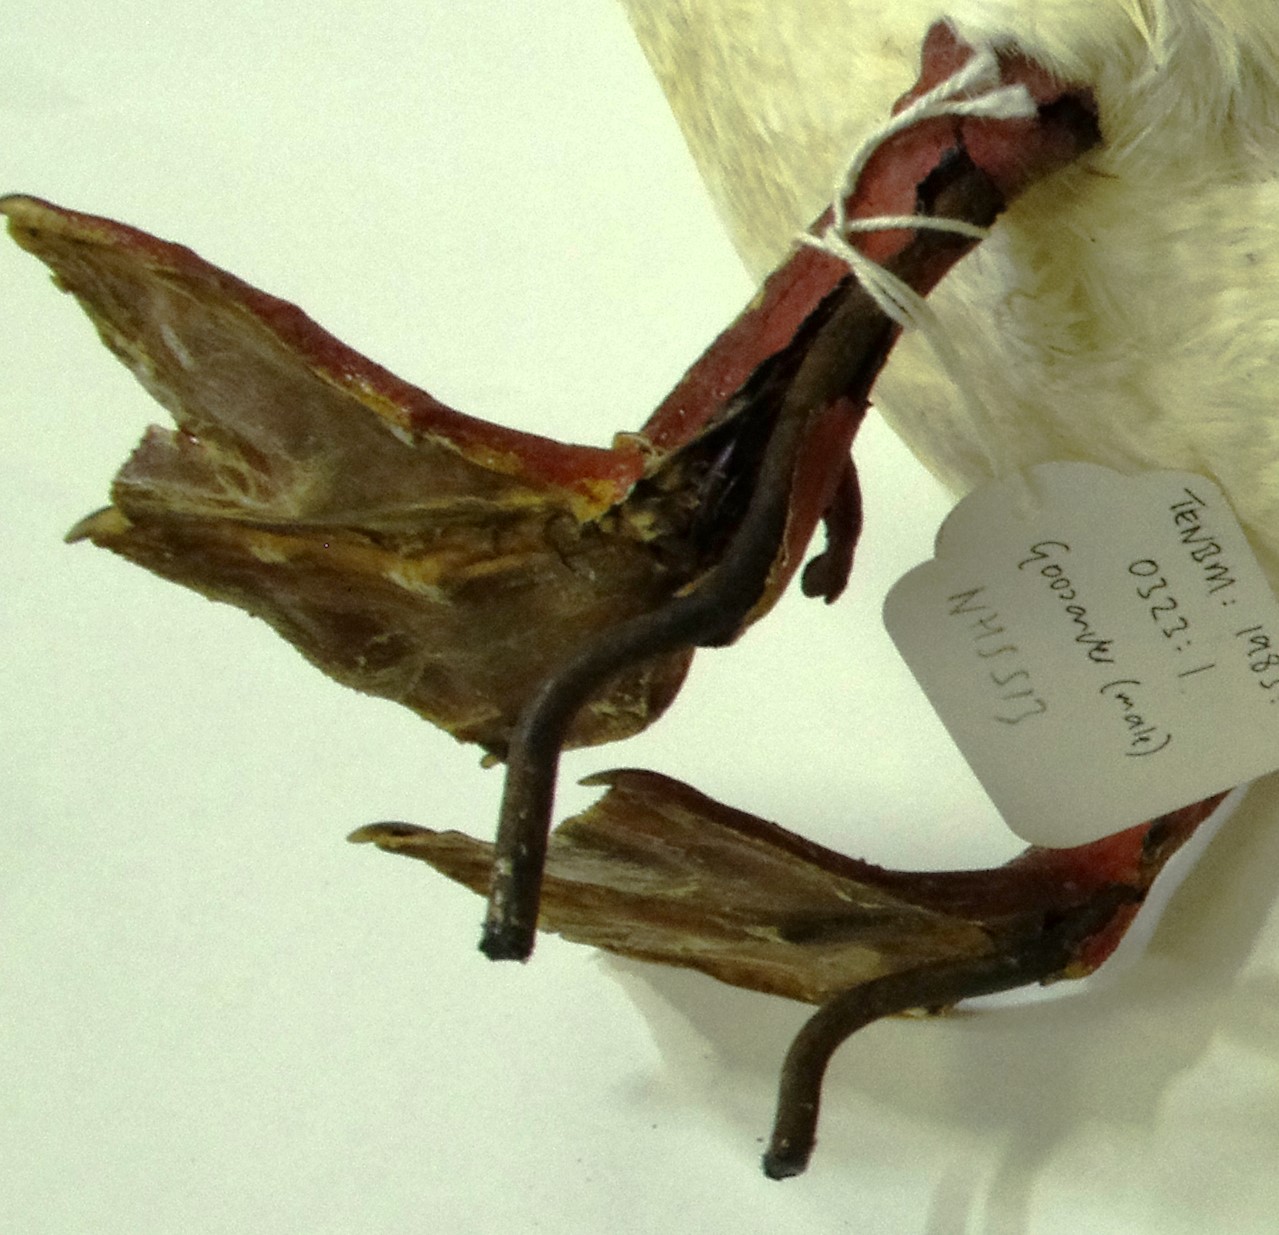
As you can see, the wire in this bird was pressed down through the back of the legs along the bone and out through the bottom of the foot to allow for the bird to be mounted. There are several reasons that this splitting could have happened, including the contraction of the scales on the legs as the specimen dried, and pressure on the scales when the bird was mounted.
Not every wire issue was as easy to identify. Two of the birds have sharp wire ends coming out of the side of the skin, which is a hazard and also could cause further degradation of the item. Without knowing where this wire sits, and its function, it would be unwise to attempt to trim it. This is where I approached our trusty x-ray machine.
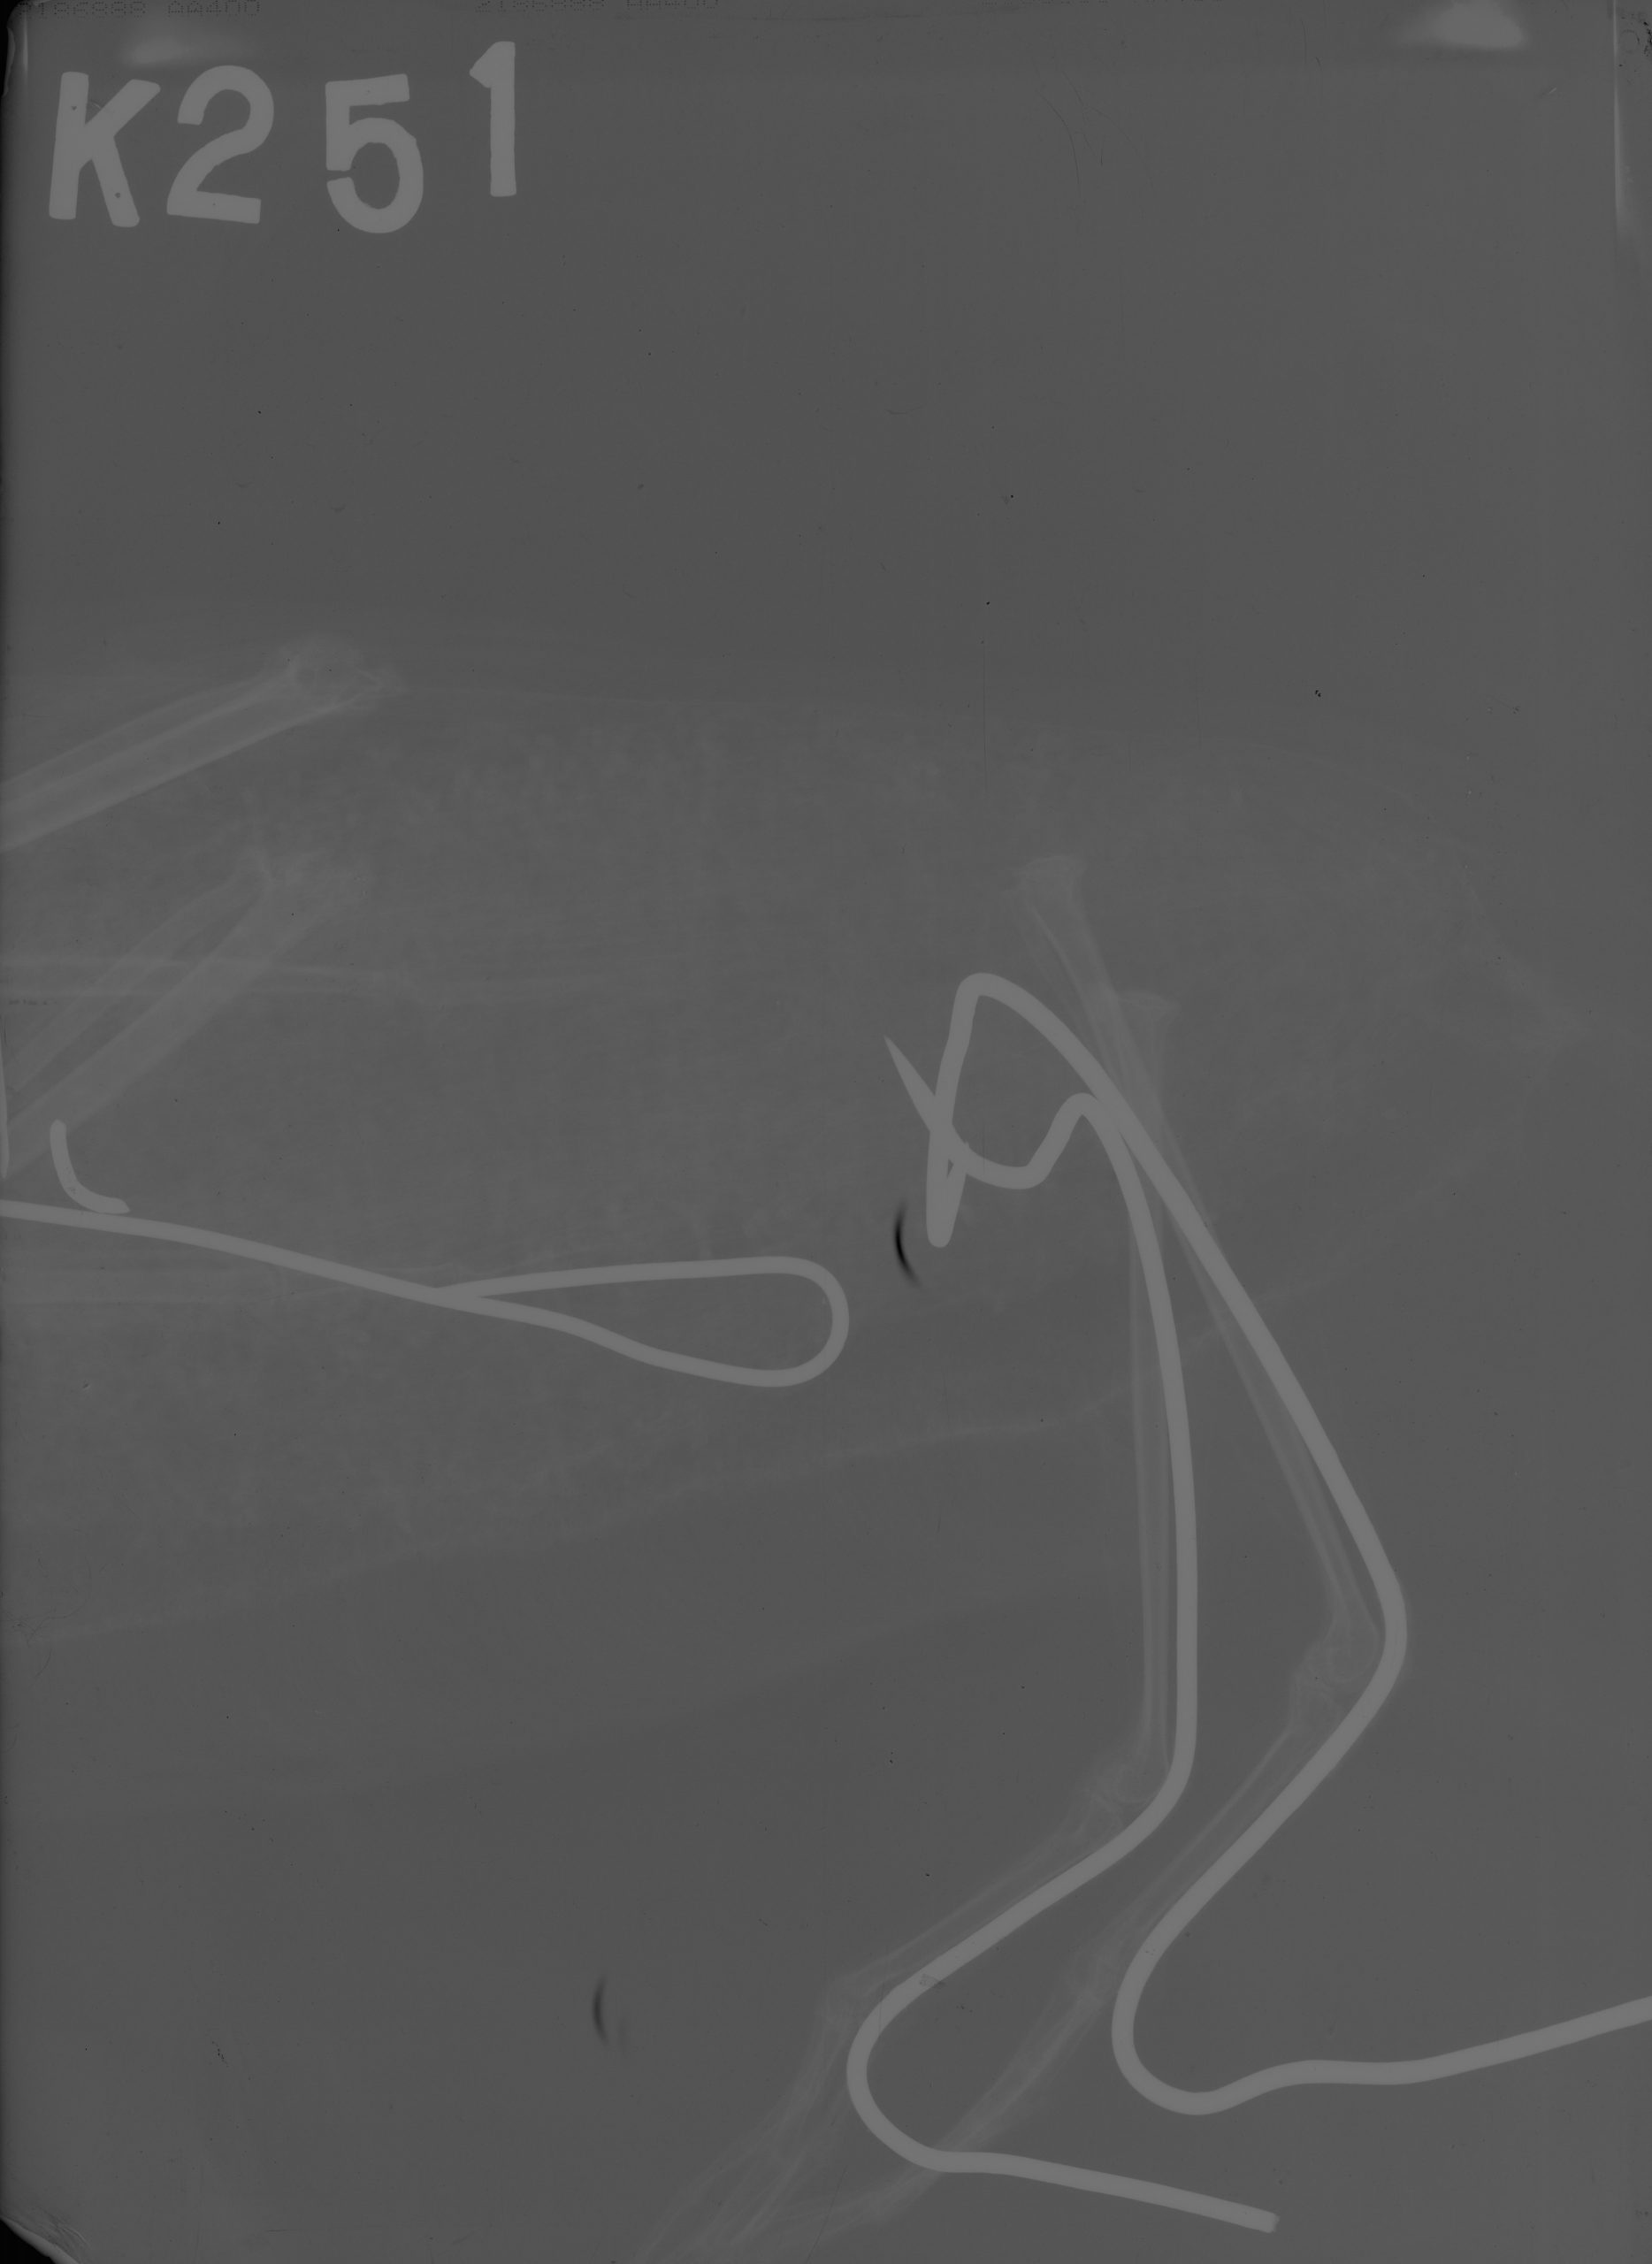
(Authors Own, 2022)
The above shows a Manx Sheerwater and the exact location of the wires. While it took a little bit of time to find out exactly what settings were needed on the x-ray machine, eventually I settled on 60kw for 3 minutes. This allowed me the best view of all of the bones and wires inside the bird. These were used to put together an action plan of how best to deal with the extruding wire (and were also really interesting to see!).
Surely There Are Risks?
There are, of course. Everything comes with a risk.
As a conservator, and more widely as a person, it is so easy to get caught up in the excitement of knowing how something is done. This can lead to over-confidence and make you more likely to go rushing into a treatment that may not actually be best suited to the issue at hand. I have had to catch myself a few times when writing my condition reports and repair recommendations, and have had to force myself to take a step back and look at things again. Creation and repair are different things, and making assumptions based on only the practices that you know can lead to mistakes or even damage to the items that you are looking to conserve. Not every taxidermy is made the same way, and your knowledge is not always applicable.
In Conclusion
Would I recommend taking a commercial taxidermy class to someone who is interested in conserving taxidermy? Absolutely. It provides so much context and (literally) hands-on knowledge that can be invaluable in helping you conserve the taxidermy that is in your care. I fully intend to continue learning and developing my taxidermy skills, both for the posterity of the craft, and the help that it can provide for natural history conservation.
Classes discussed:
If you have any questions, please feel free to contact me via:
Email: ThomasEC6@Cardiff.ac.uk
Instagram: emmathomasconservation
Twitter: emmathomascons
- March 2024 (1)
- December 2023 (1)
- November 2023 (2)
- March 2023 (2)
- January 2023 (6)
- November 2022 (1)
- October 2022 (1)
- June 2022 (6)
- January 2022 (8)
- March 2021 (2)
- January 2021 (3)
- June 2020 (1)
- May 2020 (1)
- April 2020 (1)
- March 2020 (4)
- February 2020 (3)
- January 2020 (5)
- November 2019 (1)
- October 2019 (1)
- June 2019 (1)
- April 2019 (2)
- March 2019 (1)
- January 2019 (1)
- August 2018 (2)
- July 2018 (5)
- June 2018 (2)
- May 2018 (3)
- March 2018 (1)
- February 2018 (3)
- January 2018 (1)
- December 2017 (1)
- October 2017 (4)
- September 2017 (1)
- August 2017 (2)
- July 2017 (1)
- June 2017 (3)
- May 2017 (1)
- March 2017 (2)
- February 2017 (1)
- January 2017 (5)
- December 2016 (2)
- November 2016 (2)
- June 2016 (1)
- March 2016 (1)
- December 2015 (1)
- July 2014 (1)
- February 2014 (1)
- January 2014 (4)